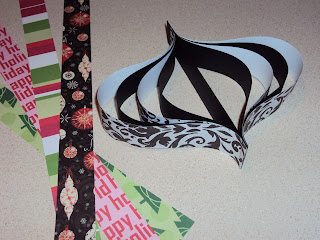
Paper bulb ornaments can be a nice touch to your holiday decor. They are easy to make and can be tailored to fit any kind of holiday or theme. I make mine out of a combination of regular weight scrapbooking paper and a corresponding solid in cardstock. Using part cardstock gives a more firm support.
 There are countless options in terms of paper prints and design. You can create these great pieces for Christmas, Easter, Halloween, Birthdays...the occasisons are limitless. It's possible that you'll gain inspiration to make these for another holiday, just from standing in the paper aisle and seeing your options.
 Be careful when it's time to pack up the holiday and store these ornaments. You'll want to put them away in some sort of container that you can lay them all flat, being cautious not to compromise the shape of each piece. You'll also want to be sure that you place them in a dry spot. Leaving them somewhere that gets damp will likely cause the paper to become disfigured. It might be wise to place a sheet of tissue paper in the bottom of the container as well as on the top before closing. This may help in the event there is a moisture issues as well as keep the ornaments from sliding around in your container.
The instructions below will create a basic ornament as picture above. Feel free to embellish with things such as glitter, ribbon and bows, tassels on the bottom, a bell attached by ribbon or a piece of greenery. These ornaments are so versatile. Add your own personal touch to each one and have one of a kind ornaments for your favorite holiday.
Supplies
Paper of choice
Scissors
Ruler
Stapler (or any other fastening option you'd like)
I will sometimes just grommets to fasten. I have a great grommet tool from my local craft store.
Instructions
- You will first need to choose your paper and then begin cutting it into 1 inch wide strips. You will need a total of nine (9) strips per ornament.
- Cut the following pieces from your 1 inch wide strips. I try to rotate between pattern and solids, just to add interest.
1 - 5.5 inch strip (for the center piece)
2 - 6 inch strips
2 - 7 inch strips
2 - 8 inch strips
2 - 9 inch strips
- Stack your strips into a pile in the following order. Be sure that you lay your strips, printed side outward from the 5 inch center piece.
9in - 8in - 7in - 6in - 5in - 6in - 7in - 8in - 9in
- Once all of your strips are in order, attache them all together at the bottom of the pile where all the pieces meet together. This is where you can be more creative on what you attach with. A simple staple is sufficient. You can cover the staple if you'd like by attaching a small piece of ribbon with a glue gun.
- The next step requires that you hold the strips tight, You want to gather the opposite ends (uneven lengths) in order to attach it to the top of the 5.5 inch center piece. Attach it to the top of the center piece in the same way you attached the bottom. I typically leave a half inch of the center piece exposed at the top so that I can punch a hole in it to use as the hanger.
No comments:
Post a Comment