Wednesday, November 30, 2011

Christmas Krinkles: Tableware

Over the years the Krinkles line has evolved beyond just ornaments.  You can also purchase things like embroidered tea towels, trinket boxes, stockings, etc.  Also a part of the Krinkles line is are really fun tableware.  There are some fun ceramic pieces that feature the typical Krinkle high heal shoes as the base.  A few of the pieces that I have fallen in love with are the cake plates, serving trays and cupcake holders. 


Cupcake Holders

I will likely never use these to serve food but will use them to decorate in a heartbeart. 
I rotate my design schemes each year and only pull out a mix of the Krinkles every few years.  This happens to be one of those years.  I plan on using my cake plates as the platform to display other Krinkle pieces.  Check back after my December 2nd open house to see pics of my cake plates in action.

While some of these pieces are retired, others can be purchased from places like Angelic Dreamz, Grandin Road and eBay

Salt & Pepper Shakers

Monday, November 28, 2011

How Many Lights Should You Use?

Striking a balance between the size of your tree and the number of lights is important.  Part of the charm associated with Christmas trees comes from the glow of the lights.  A tree with too few lights can seem bare and underwhelming.  It is said that as a general rule, you should have at least 50 lights per foot of tree.

Here is a breakdown of what might be considered adequate for specific tree heights.

Tree Height                                  Number of Bulbs
2 feet                                                    100-150
3 feet                                                    150-250
4 feet                                                    200-350
6 feet                                                    300-450
7 feet                                                    350-550

I personally like to error on the side of having more than I need as opposed to having too few.  I'm not known to do anything halfway so on my trees, the more lights the better.

Sunday, November 27, 2011

How To Choose The Right Tree

The long standing tradition of going out and cutting down your own Christmas tree is likely a thing of the past for most households.  The convenience and savings of using an artificial tree has changed that tradition.  I do not use live trees because of both allergy issues and difficulty keeping the tree in good shape for the long span of time my decor is up.  Here are a few things to consider if you decide to use a real tree.
Tree Size
  • Determine where you will place your tree before shopping.  Measure the height of the space to know how much room you have to work with.
  • If you don't know the height of your space, buy taller than you think you may need.  You can always trim back the top or cut back on the bottom.
  • If your planning to place your tree in a window, it's a good idea to measure the width.  This way you can purchase a tree that fits the proportions of the window.
Tree Quality
  • Be sure to check that your tree is fresh.  Signs of a tree that is already drying out are simple to spot.  It's a bad sign if the tree is already loosing a large amount of needles.  You can also bend on the bottom branches to see if it's flexible.  If they are dry and break, the tree isn't all that fresh.
  • Trees that are pre-wrapped in netting are dangerous buys.  You want to be sure and see the shape of your tree.  Buying a pre-wrapped tree could lead to disappointment when you get it home.  You may find it has an odd shape and even sections that are already dead and dried that you were unable to see.

Other Useful Tips
  • Trim 1 inch off the bottom of the tree just before putting it into the stand. This will cause it to absorb more water quickly. Give it plenty of water when you first put it up and remember to water it daily.
  • Before bringing your tree into the house, give it a firm shake to get the loose needles to fall to the ground. Then, you won't have as much to cleanup.
  • Use hot tap water (not boiling) to water the tree. This melts the sap and keeps the tree from creating a "scab" over the end.
Types Of Trees
Noble Fir Christmas Tree
This tree has fairly slim branches, which are easy to decorate and the needles are relatively soft, not prickly. It is usually quite a deep shade of green.

Norway Spruce Christmas tree
This tree tends to be slightly cheaper than other varieties as the needles will drop more easily. Keep well-watered to help keep shedding to a minimum.


Scots Pine Christmas Tree
A popular choice, this tree does hold onto its needles, but should be handled with care as the needles are very sharp.


Nordman Christmas Tree
This lovely bushy tree retains its needles very well and, with its upwards-pointing branches, decorations are in no danger of sliding off.


Blue Spruce Christmas Tree
A good tree for planting out in January, and the blue-tinge looks as striking in the home as it does outside.

Sunday, November 20, 2011

Decorating For Just Cents

I am the king of hitting Christmas clearance to get a deal on stuff to use in the future.  I may not use it for a year or two but you had better believe I'll use it someday.  I don't often buy much when it is only 50-70% off.  I like to get it when it's 75% off or more.  Here are a few steals I've gotten when I grab things that everyone else has left behind.

I got these sets from Target. They were still on the shelf at 90% off. I paid $0.50 a piece for them. I knew that I was going to use purple and light blue in 2011 so they were a steal.  Plus, you can never have enough silver and gold to add to any other color scheme..  Ornaments this small are perfect for filling glassware and other containers.


I have seperated all the pieces by color so that I can take each color to the room that it's intended for.  It saves me tons of times from sorting when I start to decorate.  I don't need any silver in the room where I'm decorating with purple.  Why add to the clutter by sorting it while using it?


I grabbed these at Dollar General for $0.20 each.  Again...small ornaments make great filler.  I used these little gold balls with the little purple as filler for my Wine/Tuscan scheme in the kitchen.  Even better...the container I filled was a wine glass.  It's the perfect accessory in the room!

Friday, November 18, 2011

Burlap Ribbon

Some time ago a co-worker saved wine bottles for me that I had intended to use to decorate in my kitchen.  I never ended up using the bottles and decided one day to pitch them.  While doing so I found that inside the boxes were a bunch of the wine corks.  I kept those with the intent of making something with them.  I finally used them this year and made ornaments (which I blogged about earlier).

After making the ornaments I decided to go with a Tuscan, rustic wine theme in my kitchen for Christmas.  My kitchen is decorated in that theme all year so that meant I could incorporate what I already had out instead of packing it up for the season.  In an attempt to make things more rustic I decided that I'd add some burlap.


I did some searching and never found exactly what I was looking for in terms of a burlap ribbon.  So...as with most things I decided to make my own.  It turned out exactly how I had hoped and looks great combined with the stamped muslin ribbon I posted about earlier.  I took a few pieces of my ribbon and tied them up into bows.  I must say that they look pretty good as well.

I have decided that I may go one step further and attempt some easy burlap valances and a throw pillow so that all areas of the kitchen tie in to the decor of the tree.  Check back to see how that all turned out.

Supplies
Burlap
Scissors
Tape Measure

Instructions

1. Decide what width you want your ribbon.  Measure out and score several sections.

2. Cut the length of the fabric.  It's best if you carefully follow allow the thread path.  This will make it easier to frey the edges.


3. To frey the edge, start pulling a thread at a time, starting with the outermost thread.


4. Continue step 3 until you have pulled far enough to get the desired amount of frey.

NOTE:  The salvage edge (finished edge from the bolt of fabric) is likely looped when manufactured to keep the burlap from freying.  You will need to trim a small amount along that edge if you wish to frey it.


Thursday, November 17, 2011

Christmas Krinkles: The First Tree

In a previous post I talked about Krinkles...one of my favorite line of collectibles by the artist Patience Brewster.  I shared how my love (or obsession) with them began the first year that I worked for Bergner's, setting up the Trim-A-Home department.  That year they had purchased the Krinkles display tree.  I fell in love with the tree as I was unpacking and hanging the ornatments on it.  The tree is supported at the base by four large red high heel shoes...which are a trademark feature for the collection.


I was very lucky to be able to purchase the tree at the end of the holiday.  It has been quite a conversation piece and something that a lot of friends look forward to seeing.  I don't use it every year but when I do, I typically decorate the rest of the room that it's in with other pieces from the Krinkle collection.  The tree hasn't been out for the last two years so I decided that this was a good year to use it again.  I'll post pics after the open house (December 2nd) and also feature some of the pieces that I'll be using this year.

Krinkles Mini Ornament Display Tree

Saturday, November 12, 2011

Feather Topped Ornaments

A few years back feathers made their way into my arsenal of decorating supplies.  It all started by these very cool but simple ornaments I found while searching around online.  My Christmas decorating has never been the same since.  Here is how is all started...


This ornament that I found online was a very simple glass ornament...solid colored with a band of feathers wrapped around the top.  Of course the site I was surfing around wanted some ridiculous amount of money for a set of two of them.  There was no way I would ever spend that kind of money for something like that BUT it did get the wheels turning in my head about how I could make them myself. 

I made a quick dash to Hobby Lobby and was lucky enough that their feathers and boas were half price (keep an eye out because they are usually on sale every 2-4 weeks).  I grabbed some plain siver ball ornaments, a rope of black marabou (a thinner type of feather boa) and headed home to make my own ornaments.

 It only took a few supplies that I already had at home and Ta Da...I had made really neat ornaments and found a new material that changed the future of my Christmas trees.  I started using feathers in ways I would've never imagined.  Check back because I'm going to show you the many other ways I have incorporated feathers into my Christmas designs.  You won't wna to miss it!

Supplies
Ornaments of choice
Marabou (color that you choose to coordinate with your ornaments)
Scissors
Hot glue gun & glue


(I suggest having a vaccum close to minimize the flying feathers.  Trust me...they will be EVERYWHERE...Ha ha)

Instructions

1. Grab an ornanment and your marabou.  You'll need to cut a piece of marabou that is just big enough to wrap around the cap & hook of the ornament.

2. Run a ring of hot glue around the cap

3. Attach the marabou piece quickly, before the glue dries.  Press is firmly into the glue so that it can grab onto the marabou tightly enough to hold it around the cap.

4. Add a hook and your ornament is ready to hang.

Thursday, November 10, 2011

Featured CD - Crystal Lewis

If you like a more jazzy style of Christmas music then you'll like another one that I keep in my collection.  HOLIDAY: A COLLECTION OF CHRISTMAS CLASSIC by Crystal Lewis.  The styling for this album has a great lounge feel to it.  This CD is perfect to have going in the background while hosting a casual holiday evening with guests.


Saturday, November 5, 2011

Christmas Is In The Air...Literally Hanging From The Ceiling

Just because you might be short on space doesn't mean you have to scale back on your holiday decor.  I live in a small house with very little square footage.  I don't have a ton of floor space that I can spare for Christmas trees.  I own a few pencil trees which are thinner with a smaller diameter than a standard tree.  Those trees are great but I always like to step out of the box and do something different.  I started taking my trees off of the floor and into the air!

Bedroom tree in 2009, hanging by chain
You read correctly...I hang lots of trees from the ceiling.  Not only does it save a ton of floor space but it also allows the ornaments that I hang to dangle freely...which I think is really nice.  Upside down trees are becoming more and more popular but still require a lot of floor space as well as a loaded checkbook.  I started hanging my trees years ago and I did so at very little cost.  In fact, the white tree in the pictures below came from Dollar General about ten years ago.  The best trees are the six or six and a half foot unlit trees from Walmart.  They generally cost anywhere from $18-22 dollars.

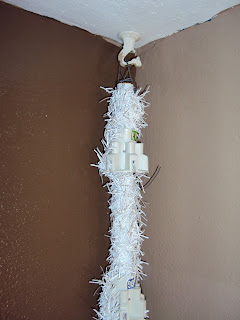
I hang my trees two different ways.  One is flush in a corner, flush with the ceiling.  This way is essentially like putting up a quarter of the tree.  The instructions and pics on the corner tree are listed below..  The other I love to do is to suspend the entire tree from the ceiling with chain...like a chandelier.  Hanging your tree this way allows you to hang the tree as close to the ceiling or the floor as you like. 

Don't be intimidated by the instructions.  Converting a tree into one that hangs upside down isn't nearly as difficult as it may seem.

Supplies
Christmas Tree
Sturdy while or 2 Wire Hangers
Ceiling Swag Hook

Tools
Saw - Hack or Jig
Drill
Pliers/Wire cutters


It is very important to note that this only works on unlit trees which have branches that you insert one by one into a cradle that is attached to the pole.  Pre-lit trees that are hinged and fold up will not work.

Preparing The Tree Pole

1. You will need to cut off the bottom piece of the pole.  Using a hack or jig saw, cut off the metal pole just about two inches under the last plastic cradle that holds the branches.
2. Drill holes through both sides of the pole right under the plastic cradle.
3. Using strong, sturdy wire or one wire hanger, cut and create a piece that will thread through the holes and then twist together, creating a hanger.  This is how you will hang the pole from the swag hook.

4. If the tree you are using has more than one pole section, you will need to connect one pole to the other so that they stay in place (making one pole support) while hanging upside down.  Cut another large piece of wire or the other hanger and use it to secure one pole to the other.  Thread the wire or hanger through a branch hole on the top plasctic cradle.  Connect it to a branch hole on the bottom on the next pole piece and secure them together.  This will hole the two pole pieced together while hanging upside down.
I've turned the pole around so you can see how I've connected the two pieces


Building The Tree

You will need to have a secure anchor to hold the tree in the ceiling.  The best way to do this is to put in a ceiling swag hook.  Be sure to use the aligator clip that comes with it to ensure that it will be secure enough to hold your tree.  Instruction for installing your hook should be located on the hook package.  If you tree has more than one pole piece and you had to connect the poles together with wire, hang the pole so that the side that you connected together with wire is facing the wall.

1. Begin assembly the tree with the largest branches at the top
2. Fluff the branches and insert them into the plastic cradle which will be upside down. 


  • The branches that are flush against the ceiling or wall will need a little extra attention.  Fluff them so the part of the branch that will be flat against the wall is flat.
  • You will not need to use all of the pieces for each size because a portion of the tree is against the wall and won't be used.  Save those pieces to use as filler once complete.


3. Work your way down the tree until you have reached the bottom branch cradle.  Your tree will likely have a single top piece that will need attached.  Simply insert the piece into the poll.  Next, take the nearest branch from the top section, pull it up toward a branch on the last cradle and wrap it around.  This will serve as a "tie" to keep the top section from falling out of the bottom of the pole.

4. Fluff any unused branches and instert them into the tree to fill in any spots that look bare.  I simply instert them into the tree and twist one of it's branches with a piece that is secured into a cradle. 

I also take some of the left over pieces to create a matching swag.  Simply layer the fluffed branches over one another, covering the exposed branch ends.  Hang above a window or lay on a coffee table.  The tree and any swags you made are ready to be decorated.
White tree and swag in 2008


White tree and swag in 2009

Wednesday, November 2, 2011

Try Something New & Unusual

I get bored so easily with the same thing over and over.  I have made it a rule to never decorate a tree the same two years in a row.  That doesn't mean that I don't reuse the decorations.  I Most people drag the same tree out from year to year and rarely ever add much new to the ornaments.  If you're like me and would like to add a little pizazz to your decor then try doing something new and unusual.

Try finding a new tree and give your worn out old artificial a break...and by new I don't mean the same tree, different height.  Find something out of the ordinary.  There are lots of options out there if you look in the right places.  Start at a local department store or specialty gift shop.  Often times companies like Department 56 create a special "display tree" to sell with a particular holiday collection.  Many times the store will buy the tree to diplay the pieces and then sell it when the seaon is over.

On a recent trip to Shipshewana Indiana I found a display tree that I fell in love with.  I actually found the same exact tree in two different stores but couldn't talk them into selling it to me.  It was a Jim Shore display tree, produced by Department 56.  I rushed back to the hotel that very night and search for it on eBay.  I was pretty bummed to not find it.  I did some random searching for a while without any luck.  Out of the blue one day I decided to type it into eBay again and this time I found it.  I was super excited and purchased it.  Here is the stock picture of this tree (which doesn't do it justice).


This tree is going to be pretty amazing after it gets the "Donnie treatment."  I have re-wrapped the rings with a branch garland and then put lights on it.  Check back after December 2nd to see pics from this year's decor.  This tree will sit next to my faux fireplace mantel, decorated in Silver & Gold, with accents of sheet music and black. 

Here are a few pictures of some other new and unusual trees.


http://www.tannenboing.com