 |
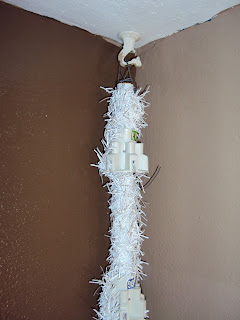
| Bedroom tree in 2009, hanging by chain |
I hang my trees two different ways. One is flush in a corner, flush with the ceiling. This way is essentially like putting up a quarter of the tree. The instructions and pics on the corner tree are listed below.. The other I love to do is to suspend the entire tree from the ceiling with chain...like a chandelier. Hanging your tree this way allows you to hang the tree as close to the ceiling or the floor as you like.
Don't be intimidated by the instructions. Converting a tree into one that hangs upside down isn't nearly as difficult as it may seem.
Supplies
Christmas Tree
Sturdy while or 2 Wire Hangers
Ceiling Swag Hook
Tools
Saw - Hack or Jig
Drill
Pliers/Wire cutters
It is very important to note that this only works on unlit trees which have branches that you insert one by one into a cradle that is attached to the pole. Pre-lit trees that are hinged and fold up will not work.
Preparing The Tree Pole
1. You will need to cut off the bottom piece of the pole. Using a hack or jig saw, cut off the metal pole just about two inches under the last plastic cradle that holds the branches.
2. Drill holes through both sides of the pole right under the plastic cradle.
3. Using strong, sturdy wire or one wire hanger, cut and create a piece that will thread through the holes and then twist together, creating a hanger. This is how you will hang the pole from the swag hook.
4. If the tree you are using has more than one pole section, you will need to connect one pole to the other so that they stay in place (making one pole support) while hanging upside down. Cut another large piece of wire or the other hanger and use it to secure one pole to the other. Thread the wire or hanger through a branch hole on the top plasctic cradle. Connect it to a branch hole on the bottom on the next pole piece and secure them together. This will hole the two pole pieced together while hanging upside down.
 |
| I've turned the pole around so you can see how I've connected the two pieces |
Building The Tree
You will need to have a secure anchor to hold the tree in the ceiling. The best way to do this is to put in a ceiling swag hook. Be sure to use the aligator clip that comes with it to ensure that it will be secure enough to hold your tree. Instruction for installing your hook should be located on the hook package. If you tree has more than one pole piece and you had to connect the poles together with wire, hang the pole so that the side that you connected together with wire is facing the wall.
1. Begin assembly the tree with the largest branches at the top
2. Fluff the branches and insert them into the plastic cradle which will be upside down.
- The branches that are flush against the ceiling or wall will need a little extra attention. Fluff them so the part of the branch that will be flat against the wall is flat.
- You will not need to use all of the pieces for each size because a portion of the tree is against the wall and won't be used. Save those pieces to use as filler once complete.
3. Work your way down the tree until you have reached the bottom branch cradle. Your tree will likely have a single top piece that will need attached. Simply insert the piece into the poll. Next, take the nearest branch from the top section, pull it up toward a branch on the last cradle and wrap it around. This will serve as a "tie" to keep the top section from falling out of the bottom of the pole.
4. Fluff any unused branches and instert them into the tree to fill in any spots that look bare. I simply instert them into the tree and twist one of it's branches with a piece that is secured into a cradle.
I also take some of the left over pieces to create a matching swag. Simply layer the fluffed branches over one another, covering the exposed branch ends. Hang above a window or lay on a coffee table. The tree and any swags you made are ready to be decorated.
 |
| White tree and swag in 2008 White tree and swag in 2009 |


No comments:
Post a Comment